Synth1 Read Only Folder Can't Save Presets
How to use Nexus OSS User Access Management
- Abode
- Blogs
- How to use Nexus OSS User Access Management
What is Nexus OSS
Nexus OSS is a gratuitous artifact repository with universal format back up. It provides a single source of truth for all your components, binaries, and build artifacts, too every bit efficiently distribute parts and containers to developers. It is deployed at more than than 100,000 organizations and helps centralize, store, scale, and accommodate builds and packages for any software supply concatenation.
Nexus besides provides universal support for all popular build tools, such as Maven/Java, npm, NuGet, Captain, Docker, P2, OBR, APT, G, R, Conan, and more than. It also provides support for the JBM ecosystem, including Gradle, Ant, Maven, and Ivy, and helps manage components from dev through commitment with binaries, containers, assemblies, and finished goods. Information technology is compatible with Eclipse, IntelliJ, Hudson, Jenkins, Boob, Chef, Docker, and more.
Nexus helps development teams to exist efficient and flexible by providing steam-line component sharing, insights and analytics into component security, licensing, and quality bug, and allows developers to build offline with remote packet availability.
Access controls
Access control is the ways by which duty is explicitly applied to an individual or group. They are unremarkably enabled through system-based controls, AKA role-based access controls. The model used is known every bit RBAC, which gives the gatekeeper to Nexus Repositories the authority to prescribe who or what process may accept admission to a specific repository, and the type of action that's permitted. The goals of RBAC are to split up the access and controls to users with the appropriate permissions, duties, and skillsets to work on sure areas.
For organizational planning, the highest level of security is reals, which allows admins to consul credentials for Nexus repository admission, from a local instance of NXRM, admins tin configure this level of security direct. The lowest level of security are content selectors, which allow admins to divide and repository into separated protected namespaces for each production, team, or project. Content Selectors are created with a special expression language syntax called CSEL, which can be used to add specific attributes to any repository.
Nexus Repository Manager OSS utilize RBAC that gives admins very fine-grained command over user rights to:
- Read from a repository or a subset of repositories
- Administer the repository manager or specific parts of the configuration
- Access specific parts of the user interface
- Deploy to repositories or even but specific sections of a repository.
The default administrator user gives you private to all aspects of the Nexus Repository Manger (NXRM) and uses the username admin and the initial countersign which can be found in an admin.countersign file in the $data-dir directory afterwards startup.
The default configuration comes with roles and users with a standard gear up of permissions. Y'all can create and customize security settings to protect repositories for multiple departments or development groups. Nexus repository director provides a security model that tin adapt to the state of affairs.
Security related configuration can be performed with the feature views available via the security section of the Assistants main bill of fare. Many of the following features are only available to users with the necessary privileges to access them. The role based access command system is backed by different Authentification and Authorizations systems and are designed around the following security concepts:
- Privileges:Rights to read, update, create, or manage resources and perform operations related to the user interface also as the components managed by the repository manager in the various repositories. The repository director ships with a set of core privileges that cannot be modified.
- Roles:Privileges can be grouped into collections called roles to brand information technology easier to ascertain privileges common to certain classes of users.
- Users:User can be assigned i or more than roles, and model the individuals who volition exist logging into the user interface and read, deploy, or manage repositories as well equally connect from client tools such every bit Apache Maven.
Realms
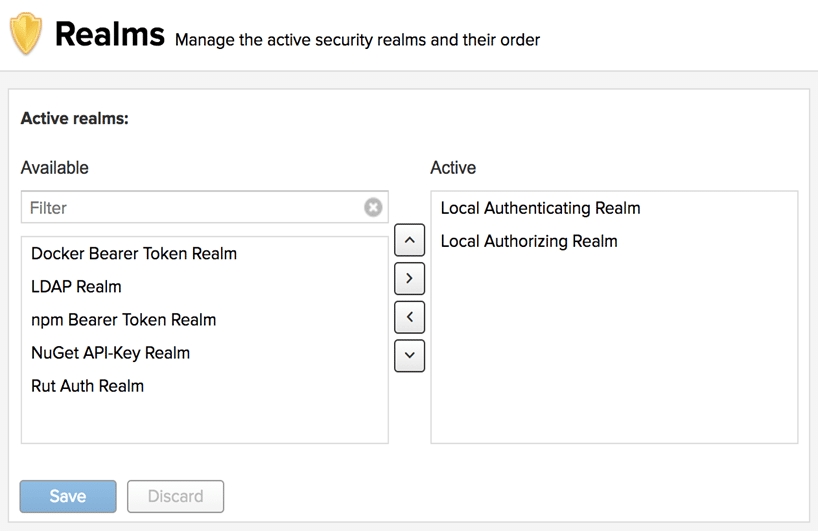
The featured view for security realms administrators allows admins to activate and prioritize security realms used for authentification by calculation them to the active list on the correct and placing them higher or lower on the list. The Reams view and be accessed via the Realms menu item located under Security in the Administration main menu. This configuration determines what authentification realm is used to grant user access and the lodge the realms are evaluated.
Common Realms
- Local Authenticating Realm and Local Authorizing Realm: built-in realms used by default. They allow the repository manager to manage security setup without boosted external systems. The recommenced ordering is to go on the local realms at the top of the agile list, that way in the event of system recovery, if you have them lower in the order (or removed), then restoration may be more than difficult.
- Crowd Realm: This realm identifies external storage in an Atlasssian Crowd arrangement.
- Default Function Realm: This realm will suspend the configured role to all users when they are authenticated
- Docker Bearer Token Realm: This realm permits docker repositories with the ability to take anonymous read enabled on their repositories in conjunction with the Strength basic Authentication configuration department.
- LDAP Realm: Identifies external storage in an LDAP arrangement.
- npm Bearer Token Realm: This existent permits users with previously generated bearer tokens to publish npm packages
- NuGet API-primal Realm: Is required for deployments to NuGet repositories
- Rut Auth Realm: Uses an external authentication in any arrangement with the user authorisation passed to the repository managing director in HTTP header field.
- SAML Realm:Uses an external Identity Provider (IdP) to handle authentication
- User Token Realm: Activates token-based authentication for users as a substitute for plain-text username and password hallmark. When the user token capability is enabled, the realm is automatically added to the Agile Realms List.
Privileges
Privileges control access to the specific functionality of the repository manager and can be grouped as a role and assigned to a specific user.
To access the Privileges command, go to Security in the Administration card, where it'due south listed as a sub-department. A list of privileges is prebuilt in the repository manager. This feature allows you to inspect existing privileges and create new ones.
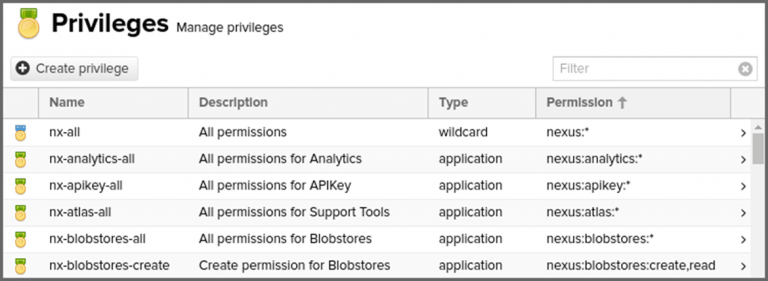
The list has the post-obit fields:
- Name:The internal identifier for the privilege
- Description: A human-readable description of the purpose of the privilege
- Type: the Aspect of the repository director to which this privilege applies
- Permission: The internal permission definition as used by the security framework.
Privilege Types
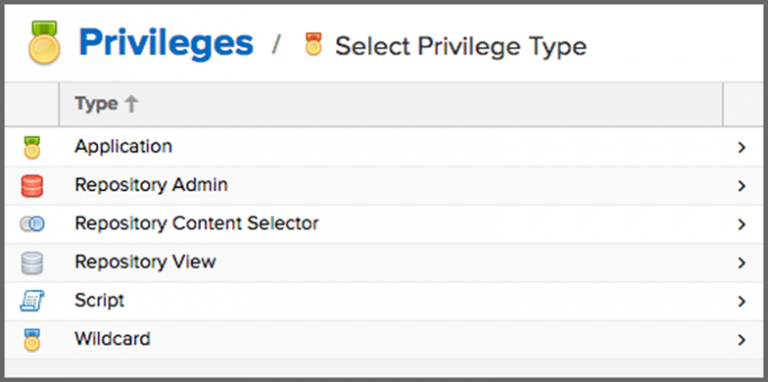
Click the create privilege button to view a listing of privilege types. Select the corresponding are of the repository managing director you wish to grant permissions. When y'all create a new Privilege type, y'all must assign at least ane activity in the actions field.
The privilege types are equally follows:
- Application: These are privileges related to a specific domain in the repo manager
- Repository Admin: These are privileges related to the admin and configuration of a specific repository
- Repository content selector:These are privileges attributed to filtered content within a format, evaluated against a content selector.
- Repository View:These are privileges decision-making access to the content of a specific repository.
- Script: These are privileges related to the execution and management of scripts
- Wildcard: These are privileges that use patterns to group other privileges.
Privilege Actions
Actions are functions assuasive an explicit behavior the privilege can perform with the associated role.
You can assign a single or a combination of comma-delimited actions when creating new privileges. The privilege blazon to which you utilize any of these actions volition perform the actions implied beliefs.
The actions are as follows:
- Add:This action allows privileges to add repositories or scripts.
- Browse: Allows privileges to view the contents of associated repositories Unlike the read privilege, scan can but view and administrate repository contents from the UI.
- Create: Allows privileges to create applicable configurations within the repository manager. Since read permission is required to view a configuration, this action is associated with most existing create privileges.
- Delete: This activity allows privileges to delete repository manager configurations, repository contents, and scripts. A read action is usually associated.
- edit: Allows privileges to alter associated scripts, repository contents, and repo administration
- read: Allows privileges to view various configuration lists and scripts. Without this action, whatsoever associated action will allow a privilege to see these lists but non its contents. The read action as well allows privileges to apply tools that can look at content from the control line.
- update: This action allows privileges to update repository managing director configurations. Well-nigh existing privileges with the update include read deportment, in social club to view the repository manager configuration updates.
- *: This action is a wildcard giving you lot the ability to grouping all actions together.
Creating new privileges
To save a new custom privilege, cluck the create privilege push. The privilege can exist establish listed among the default privileges on the primary Privileges screen. You can utilise the filter input box to detect a specific privilege.
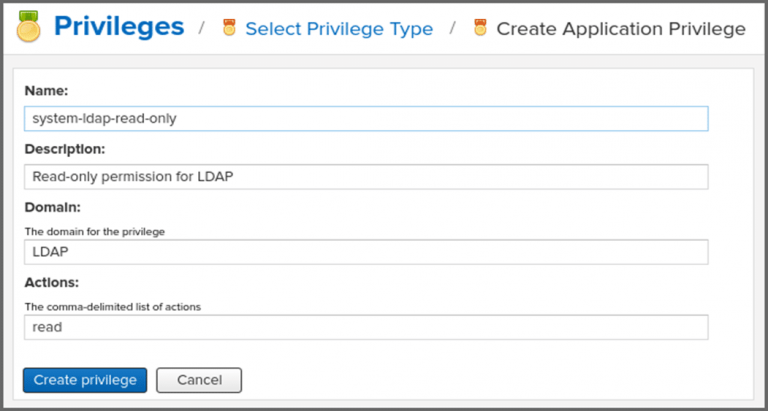
When creating a new Awarding privilege, you lot generally need to include the Proper name, Description, Domain, and actions associated with the privilege.
An instance of creating a new Application privilege:
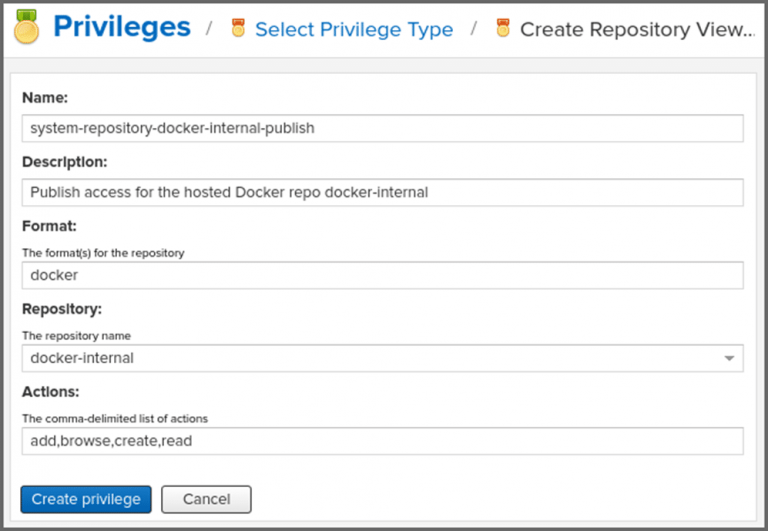
When creating a new repository view privilege, you by and large demand to include the Proper noun, Description, Format, Repository, and actions associated with the privilege. This form is completed for a privilege granting sufficient access to a specific hosted repository.
An example of creating a new Repository View privilege:
Roles
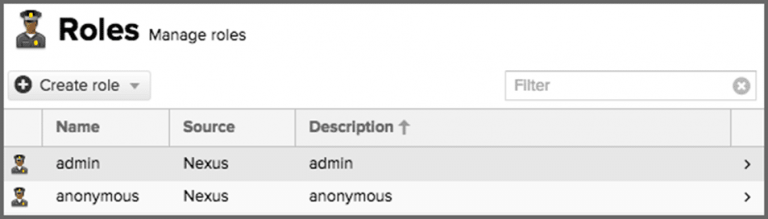
Roles aggregate privileges into a related context and can be grouped to create more complex roles. The Repository Manger ships with a predefined admin as well as an anonymous roles.
To inspect these roles, y'all tin go to the view accessible via the Roles item in the Security Section of the Administration main card. An example of the folio:
About machines and locations:
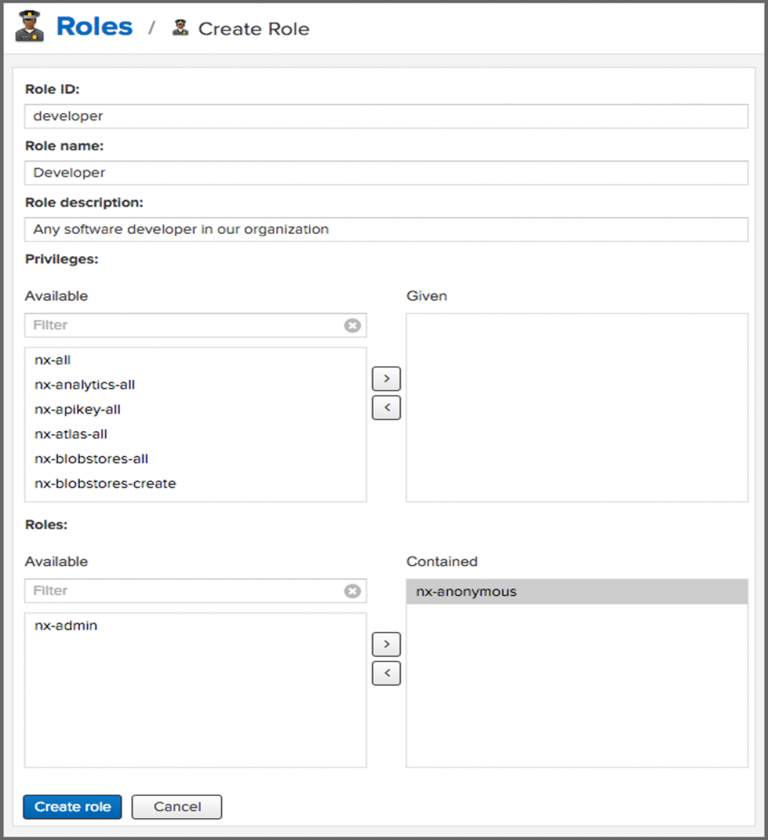
To create a new role, click the Create Role button, select Nexus Office and fill out the Role Create characteristic When creating a new role, yous will need to supply a Role ID, and a name and optionally a Clarification. Roles are comprised of either roles and individual privileges. To assign a function or privilege to a role, drag and drop the desired privileges from the bachelor listing to the given list under the privileges header. Y'all can filter to narrow downward the list of displayed privileges and the arrow buttons to add or remove privileges.
The aforementioned functionality is available under the Roles header to select amid the available roles and add together them to the listing of contained Roles.
Once you have everything setup, you tin printing the Create Part button to go the role created. An existing part can be inspected and edited by clicking on the row in the list for the Role. This function-specific view allows you lot to delete the role with the delete office button. The built-in roles cannot exist edited or deleted. The settings section displays the same section as the creation view.
An example of creating a new function view:
External Groups mapping to Nexus Roles
In add-on to creating an internal role, the create role button allows yous to create an External Office mapping to an external authorization system configured in the repository manager such as LDAP. This is something you would do if you lot want to grant every member of an externally managed group a number of privileges and roles in the repository managing director. When in the create a new role view, select External Role Mapping, and LDAP to run across a list of roles managed by that external realm in a dialog, and selection the desired grouping and confirm by pressing create a mapping. You tin can also type in a portion or the whole name of the group and it volition limit the dropdown to the selected text.
Once the external role has been selected, information technology creates a linked role. You tin can then assign other roles and privileges to this new externally mapped role like you would do for any other function. Any user that is a part of this group volition receive all the privileges divers in the created role assuasive you to adjust your generic part in LDAP to the repository-specific apply cases yous desire these users to exist allowed to perform.
Users
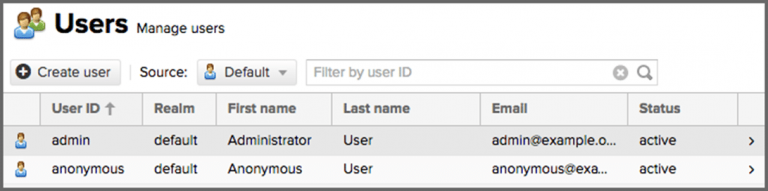
NXRM comes with two users by default: Admin and anonymous. This admin user has all privileges and the anonymous user simply has read-just privileges. The initial password for the admin user can be plant in an admin. Countersign file found in the $data-dir directory after starting the server.
The user feature view tin can be accessed via the Users detail in the Security section of the Assistants bill of fare. The initial view lists the users aslope their User ID, First Name, Last Name and electronic mail, as well equally what security Realm is elected and if the accounts status is active or disabled. The default security realm is the local NXRM realm. An example of the users display is:
Creating new Users
Clicking on a user in the listing or clicking on the Create user button displays the details view to edit or create the new user business relationship. For external users, such as LDAP or Crowd, once you lot have your external realm setup y'all can edit their permissions here equally well. But select the realm the user is on from the Source dropdown. And then type the user ID into the field to the right of that dropdown and search for it. And so click on the upshot desired to edit, same as a local user.
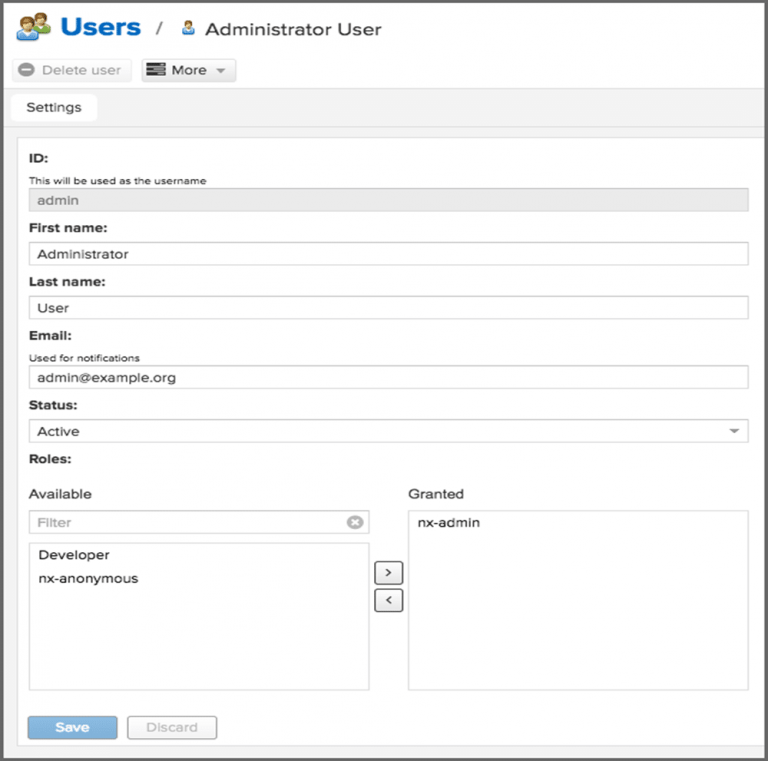
When creating a new user, the ID can be defined and remains fixed thereafter. In add-on, you can specify the user'south Offset Name, Terminal Proper noun, and Electronic mail Address. You must likewise enter and confirm a Password.
The status allows you to set an account to exist disabled or Active. The roles command allows you to add and remove defined roles to the user and therefore control the privileges assigned to the user. A user can be assigned one or more roles that in plough can include references to other roles or to individual privileges.
When editing, the more button on the header allows you to select the Change Password item in the dropdown, and the countersign can exist changed in the new dialog, provided the user is managed by the built-in security realm. For remote users, you tin but edit their profiles, not create, fields defined by the remote organisation, such as ID will be uneditable. Ensure to alter the password of the admin user to avert security vulnerabilities, alternatively, you can create other users with administrative rights and disable the default admin user.
An instance of creating a new user view:
Default Role
To enable appending a default role to all authenticated users, create a new Adequacy (which further reading can be plant here: Capability Documentation Link) using Capability type "default Role" you will then be able to select the office that yous want applied to the users. Once this is saved, the default function realm volition be added to the active list of security realms, and showtime applying the new role to all authenticated users. The default role is appended to authenticated users Dynamically, and will not show up as an assigned office to whatever user via the User settings page.
Content Selectors
Content selectors provides a ways for you to select specific content from all of your content, assuasive y'all to define what content users are immune to admission. The content you select is evaluated against expressions written in Content Selector Expression Linguistic communication (CSEL). CSEL is a lite version of JEXL used to script queries along specific paths and coordinates bachelor to your repository manager formats.
Why non JEXL? (Why is JEXL deprecated)
JEXL baed content selectors weren't performant plenty with NXRM, to address that consequence CSEL was created to support changes coming in the future releases. When upgrading NXRM from an older version using JEXL, it will automatically upgrade as many of the existing JEXL selectors to CSEL selectors as possible. Whatever remaining JEXL electors will keep to function, but information technology is encouraged to perform and upgrade as presently as possible.
Creating a Query
To create a new content selector, click on Content Selectors located in Repository from the Administration Menu, and click on Create Selector from the new menu. In the selector ID field, enter a proper noun and an optional Description for the new selector. In the Specification department use the search expression field to build your query using CSEL syntax. You can preview your selector and what results will return by clicking the Preview Results push. On click a model will appear with the listing of results. The Expression field will automatically be filled in with anything yous had in the Search expression field. Similarly, whatsoever changes to Expression volition exist saved to the Search expression when you close the preview. An example of this:
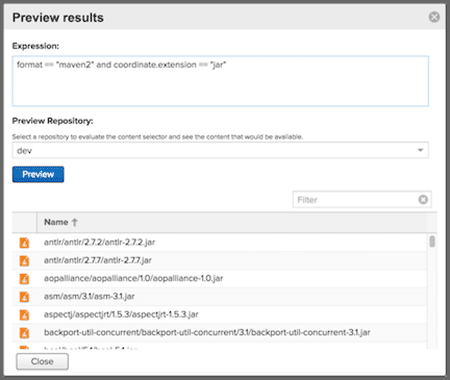
To run across results your selector would observe, select a repository or grouping of repositories from the Preview Repository dropdown and click the Preview push button. Assets that match volition be returned in the space below the filter and can be filtered upon if you wish to check on a specific result. The Name column is besides sortable in ascending or descending gild. Close returns you to the content selector creation screen.
Once you lot are satisfied with your fields, click Create selector to create the Content Selector. All saved selector queries you create will exist listed in the Content Selectors screen.
Managing Selector Permissions
As part of the security setup, you tin can create user permissions to manage the filters y'all built in the create selector grade. You can add a new privilege that controls operations such every bit read, edit, delete, and all ( * ), for components matching that selector. The privilege tin can even span multiple repositories.
To create a new content selector privilege, click Privileges in the Security Section of the Administration Panel, so click the create Privilege button. Locate and click the Repository Content Selector from the list of options in the Privilege Type option, and fill up out the following grade:
- Proper noun: Name for the content selector privilege
- Clarification: Selection description for the privilege
- ContentSelector: Use this dropdown to select from a list of selectors you had created
- Repository: Use this dropdown to select from either a range of all repository contents, all repository contents of an individual format, or repositories created past y'all.
- Actions: Grant read, edit, delete, or all ( * ) privileges for user access command.
To complete the class, relieve the new privilege past clicking to create privilege. At present you tin employ the new privilege to regulate what permissible data you want the user to access. You lot could grouping all related privileges into a part as discussed in a higher place, and y'all can then assign the roles to a user also discussed above.
CSEL Reference
Some allowable attributes for content selectors that define path and format every bit values supported by NXRM:
- Path: The path f your repository content.
- format: The format of the content for which you lot query.
Some commonly used commands:
- == : Matches text exactly,
IE format == "raw" - =~: matches a Java regular expression pattern.
IE path =~"^/org/apache/commons/.*" - =^: Starts with text, IE path =^ "/com/sample/"
- and: Match all expressions
IE format =="maven" and path=~"^/org/apache/eatables/.*" - or: Match whatsoever expression
IE format =="maven" or format =="npm" - (expr): grouping multiple expressions.
IE format == "npm" pr (format =="maven" and path =~"^/org/apache/eatables/.*")
NOTE: When writing a content selector, remember that the asset's path volition always begin with a leading slash when the selector is evaluated. This is true even though the leading slash is not displayed when searching or browsing assets.
Notation: Recollect that to permit proper access when using Tree browsing in the UI, the content selectors demand to include permissions for parent directories of the artifacts
Resources:
- Nexus Repository OSS website: https://world wide web.sonatype.com/nexus-repository-oss
- Nexus Access Control Documentation: https://help.sonatype.com/repomanager3/organization-configuration/access-control
- Role-Based Access Command: Organizational User Management: https://guides.sonatype.com/repo3/technical-guides/role-based-admission-controls/
- Nexus Repository documentation: https://help.sonatype.com/docs?_ga=ii.177040557.904573998.1591218119-1902013622.1591218119
- Nexus Realms: https://help.sonatype.com/repomanager3/arrangement-configuration/admission-control/realms

Writer: –
SEAN MALLOY
Sean Malloy is working equally an Automation Engineer at Crest Data Systems. Sean has worked on multiple automation and 508 Compliance projects for Splunk. Earlier joining Crest, Sean worked as an intern twice at SAP and has led multiple projects as function of his internship for Machine Learning and web development. Sean holds a Bachelor's caste from UC Davis.
Source: https://www.crestdatasys.com/blogs/how-to-use-nexus-oss-user-access-management/
0 Response to "Synth1 Read Only Folder Can't Save Presets"
Post a Comment